Using MCP servers from ChatGPT
Warning: Following this article implies that you are going to expose local services of your computer openly to the Internet. If you aren’t familiar with running VPN’s and services (and if you do, there is a good chance you think I’m crazy for merely suggesting this setup) I do not recommend following it. I especially advise you against running tailscale on any of your work devices, unless you want to be fired. You have been warned.
If you have been following AI trends you will have heard about MCP or the Model Context Protocol, and the sudden explosion of mcp servers (thousands of them, if we believe the newly created “MCP registries”). It’s one of those things that seem obvious in retrospect, but caught almost everyone by surprise.
MCP is no more than a standardized way of letting LLM models access “tools”. These tools can be anything that can be accessed by a software, and includes reading and writing local files, accessing databases, browsers, remote API’s, etc. which basically gives LLM’s the superpower of modifying its environment directly, instead of having to rely on a human to copy and paste the response in other program.
The protocol was created by Anthropic and the first application to support it was, obviously, Anthropic Desktop, but Open Source clients and frameworks have jumped on board (some of them begrudgingly). This has made ChatGPT Plus users, like my wife, a bit jealous of the capabilities of these
It’s being rumored that OpenAI is going to add MCP support soon, but there is actually no need to wait! Anyone can configure right now an MCP server to be accessible as an GPT Action, which are the kind of tools that ChatGPT knows how to use.
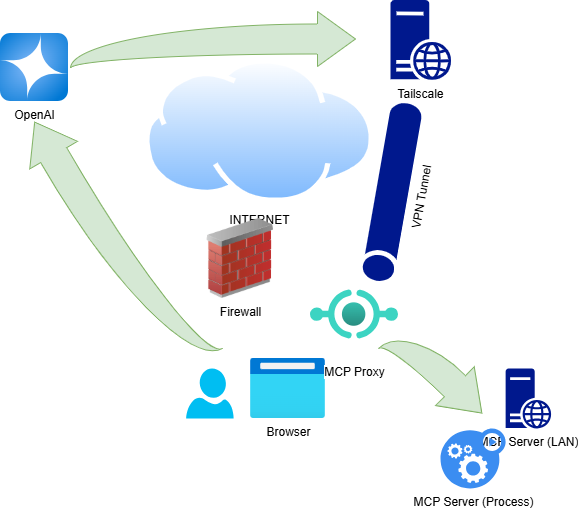
The article is divided in two parts: the concepts and the actual howto. If you want to skip the first one, here is a tldr: an “mcp to openAPI” proxy exists, so you can run one in your machine and configure tailscale to open it to the world, so ChatGPT servers can access it directly as if they were regular GPT Actions.
Concepts
“Tools”, or “functions” as they were initially called, have been a thing for more than a year now. They are basically an special use case of the “structured outputs” feature, in which the json formatted output represents a call to a function that the llm is aware of.
Models that support function calling have been trained to emit and recognize tokens which signal the start and/or end of function specification, invocation and result, similar to the better know <|im_start|>
, |<im_end>|, etc...
The inner workings vary from model to model, but from the point of view of the API the way it work is like this:
-
The llm is sent a spec with the functions and their parameters
"type": "function",
"name": "get_weather",
"description": "Get current temperature for provided coordinates in celsius.",
"parameters": {
"type": "object",
"properties": {
"latitude": {"type": "number"},
"longitude": {"type": "number"}
},
-
When an llm “decides” that it would be convenient to use a tool. It generates a json object (hopefully valid) that follows the previously sent specification.
"call_id": "call_12345xyz",
"name": "get_weather",
"arguments": "{\"latitude\":48.8566,\"longitude\":2.3522}"
}
-
The call is then, somehow, somewhere, sometime, parsed and executed in a runtime in Python, Java, or any other programming language that actually implements a function with a similar enough signature
The output is then appended to the conversation and resent to the api, so for the llm the call and the execution are part of the context as anything else.
At this point, OpenAI didn’t prescribe what should happen between the llm and the runtime, and understandably so, since this is not a particularly hard problem. The mechanism that OpenAI created to make functions available in the chat interface (only for paying customers) is called GPT Actions.
GPT Actions
GPT Actions are just REST web services attached to an OpenAPI spec which describes what the methods do and how they should be invoked. It’s the REST equivalent to WSDL’s for those old enough to remember. These services have to be exposed to the Internet so OpenAI’s server can access them, so it’s easy to infer that OpenAI expected use case are developers who look to enrich ChatGPT’s capabilities for companies or regular users.
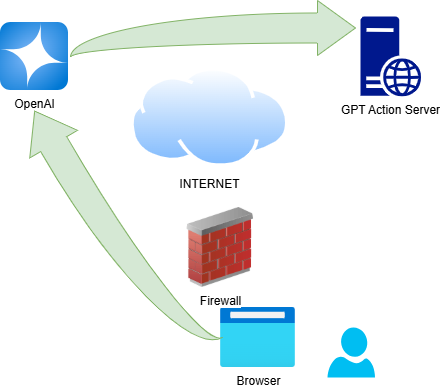
This is fine, but this model doesn’t allow users to run their own tools in their regular devices which are behind NATs and firewalls and require advanced technical skills to provision and securize. This is the gap that Anthropic cleverly used to introduce MCP.
MCP (Model Context Protocol)
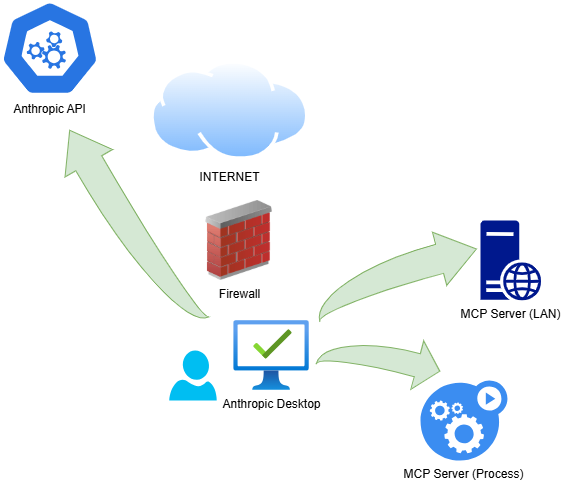
MCP is a protocol developed by Anthropic which was first featured in their Anthropic Desktop Application. A desktop application has a very important advantage over a web based one and is that it can spawn processes.
And an MCP server, in its simplest form, it’s just that: a process which reads one-line json objects over its standard input and writes one-line json objects over its standard output.
The other way of accessing an MCP server is over the net using http, just like GPT Actions, but those services don't have to be exposed to the Internet and can be run instead in the LAN of the user, well behind a firewall..
It’s not hard to see that this is an order of magnitude easier to manage, and produced the explosion of MCP servers which we are seeing today. Only after this success, Anthropic has developed MCP servers for the web version, which are functionally equivalent to GPT Actions.
But this is not the end of the story! Something can be done to bridge both approaches.
Proxying and Tunneling
Immediately after the release of MCP and its admittedly impressive demos, users started to demand for MCP support in everything. One of the projects which started to feel the pressure was OpenWebUI, probably the most popular Open Source chat interface for llm’s.
But OpenWebUI developers had important objections about how MCP worked, so took an interesting approach. Instead of baking mcp support into the main project, they decided to develop a MCP-to-OpenAPI proxy called mcpo to provide a “clean” interface to OpenWebUI.
And that’s exactly what ChatGPT understands! This puts us very close to our goal.The other thing we need is a simple way to share that url to the outer world. And that has existed for a while now.
Tailscale is a product that allows users to configure personal VPN’s. It simplifies the process of connecting all your devices in a secure manner. But more importantly to our needs, it includes a feature called “funnel”, which allows users to expose a locally running service over the Internet.
So everything needed already exists, it’s just a matter of taking the time to configure it.
HowTo
The prerequisites for configuring everything are:
-
A ChatGPT Plus subscription or better (it’s not doable from the free tier).
-
Python 3.9+ with uv installed OR docker for running mcpo.
-
The requirements of the MCP server itself. In this case I will use the puppeteer mcp server which needs nodejs and npx OR docker.
-
A Tailscale account and the software installed and configured in the device that’s going to run mcpo.
Configuring all of this in docker is possible and recommendable, since it adds a very convenient isolation layer. But it makes everything a bit more complex, so I won’t use it here.
MCPO
For running mcpo, we the only what’s need is:
-
a random string, which will work as api key
-
a description of the mcp server(s) that will be accessible through the OpenAPI endpoint.
The api key may be generated with any password generator, but this is how I like to do it.
$ openssl rand -base64 32 > api-key.txt
The most flexible way of providing mcpo the descriptions of the services you want to make accessible is to create a Claude Desktop compatible file. This allows to
For this demo, our file will contain a single mcp server for controlling a web browser.
{
"mcpServers": {
"puppeteer": {
"command": "npx",
"args": ["-y", "@modelcontextprotocol/server-puppeteer"]
}
}
}
Puppeteer is a programming interface that allows a developer to control a web browser programmatically. The MCP server built on top of it provides basic methods for inspecting the state of the browser and doing basic operations like clicking, filling text areas, etc...
Now, mcpo can be launched from the command line. For example, from powershell:
$apikey = Get-Content api-key.txt; uvx mcpo --port 9000 --api-key $apikey --config mcp_config_puppeteer.json
Starting MCP OpenAPI Proxy with config file: mcp_config_puppeteer.json
2025-05-20 16:38:23,201 - INFO - Starting MCPO Server...
2025-05-20 16:38:23,201 - INFO - Name: MCP OpenAPI Proxy
2025-05-20 16:38:23,201 - INFO - Version: 1.0
2025-05-20 16:38:23,201 - INFO - Description: Automatically generated API from MCP Tool Schemas
2025-05-20 16:38:23,201 - INFO - Hostname: XXXXXX
2025-05-20 16:38:23,201 - INFO - Port: 9000
2025-05-20 16:38:23,201 - INFO - API Key: Provided
2025-05-20 16:38:23,201 - INFO - CORS Allowed Origins: ['*']
2025-05-20 16:38:23,201 - INFO - Path Prefix: /
2025-05-20 16:38:23,201 - INFO - Loading MCP server configurations from: mcp_config_puppeteer.json
2025-05-20 16:38:23,201 - INFO - Configured MCP Servers:
2025-05-20 16:38:23,201 - INFO - Configuring Stdio MCP Server 'puppeteer' with command: npx with args: ['-y', '@modelcontextprotocol/server-puppeteer']
2025-05-20 16:38:23,201 - INFO - Uvicorn server starting...
INFO: Started server process [19848]
INFO: Waiting for application startup.
INFO: Application startup complete.
INFO: Uvicorn running on http://0.0.0.0:9000 (Press CTRL+C to quit)
Browsing to http://127.0.0.1:9000/<mcpserver>/docs will show the typical
Tailscale funnel
I hadn’t used tailscale until now, so I’m not very familiar with its feature set, but from what I have read, this has exactly the features we need for this project, since it allows very easily to reverse proxy an http or even tcp connection towards our device.
Bear in mind that the traffic is encrypted by https from ChatGPT to Tailscale, and from tailscale to our service. But tailscale infrastructure is able to see it unencrypted (assuming I have understood how the feature works correctly).
Mcpo can be configured with https, so it’s not a limitation of the program. I don’t think it’s worth it for most use cases but you have the option if you want to look into it.
What it really is a limitation of tailscale is the fact that you can’t restrict access to your service to just a subset of the Internet address space. This would be really a huge boost because I assume that identifying OpenAI owned ip segments shouldn’t be that hard, and it would greatly increase the security of the solution.
This is a bit anticlimatic because it’s just a one line command:
tailscale funnel 9000
Available on the internet:
https://desktop-xxxxxx.tailxxxx.ts.net/
|-- proxy http://127.0.0.1:9000
Press Ctrl+C to exit.
The first time you run it it will ask for authorization in the tailscale admin interface, since it’s a feature that’s disabled by default. Once it’s done, your mcp server is live on the internet.
You can test it now wilh curl using:
curl https://desktop-xxxxx.tailxxxxx.ts.net/puppeteer/openapi.json -o openapi-puppeteer.json
This file will be needed later. The only change needed is to substitute the servers part to actually point to your server:
"servers":[{"url":"/puppeteer"}] => "servers":[{"url":"https://desktop-xxxxx.tailxxxxx.ts.net/puppeteer"}]
Configuring a MCP-enabled “GPT” in ChatGPT
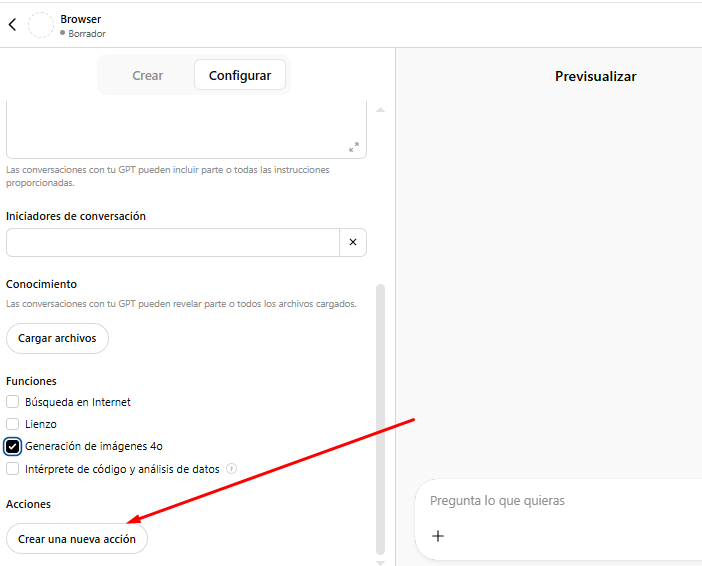
Now it’s time to configure the chatgpt side. Browse to https://chatgpt.com/gpts/mine and click “create GPT”
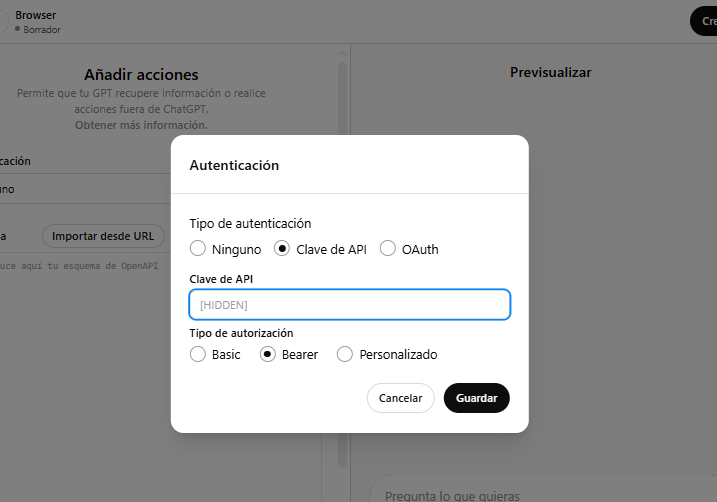
(the GUI is in spanish). Here go to “Actions”:
Setting the authentication is simple enough, just select Bearer and paste the contents of api-key.txt in the box:
In the schema textarea, dump the contents of your openapi-puppeteer.json file. You may need to edit it slightly to conform to the OpenAI restrictions (for example, function descriptions have a limit of 300 characters).
Once everything is configured, you can test it in the right side, for example, asking it to browse to chess.com:
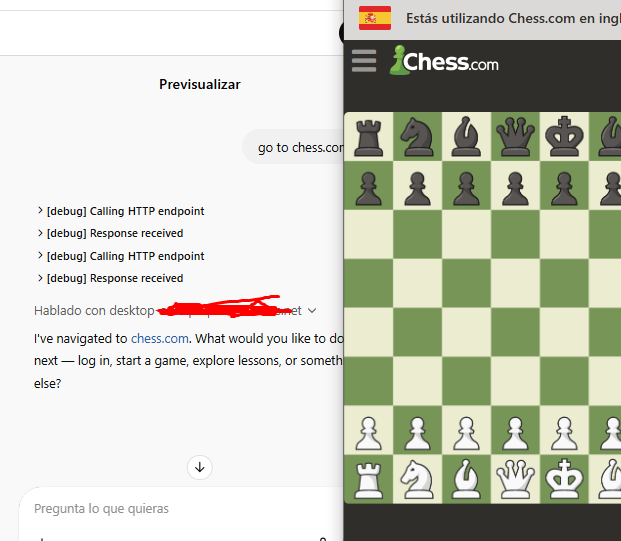
If everything looks fine, you can create your “GPT”. Remember to choose the right visibility or anyone will be able to run a browser on your desktop!
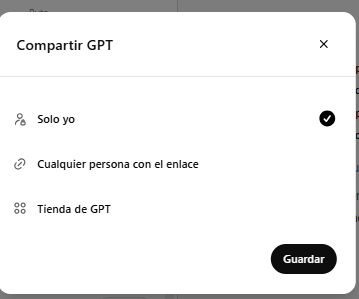
And that’s all, now you can launch your new GPT from the sidebar.
Worth it?
Maybe, but I still haven’t found a good use case. The puppeteer mcp server is a bit limited (I haven’t been able to use it in chess.com in any meaningful way, for example), and having to accept every request, no matter how harmless, makes it a bit cumbersome to use. The high latency doesn’t help either.
Update (2025-06-07):
Honestly, the first results were a bit underwhelming, but after some iterations I have managed to do some productive work.
The first change I made was to remove the explicit permission checks. This can be done by adding the x-openai-isConsequential:false flag to the OpenAPI spec to every operation you want to allow without confirmation. It’s an all or nothing setting.
Second was choosing a different, text only, mcp server. Puppeteer relies on taking screenshots of the browser, something it works in mcp. but it’s not possible for GPT Actions (you can’t even ask chatgpt to fetch and interpret an image from an url). The one I chose was Desktop Commander, which allows an LLM to run shell commands, even long running ones, in a computer.
I also ditched the tailscale setup, and instead configured an isolated container inside a VPS I have rented in Hetzner. Coupled with IP filtering (the outbound IP’s that OpenAI Actions use are published here). That’s a much safer configuration than the taiscale funnel based one, but note that it should be possible according to this PR to add ip based filtering to it using the X-forwarded-For header tailscale funnel sets for proxied communications.
And that’s it. Given the limitations, it works pretty well. ChaGPT’s 4o (which differs from the vanilla 4o that’s available in the API) it’s a pretty competent model and tool access works with minimal latency and very smoothly. I don’t think it’s a better setup than Claude Desktop with a Pro subscription, but if you already have a ChatGPT Plus, and for whatever reason you want to keep it, it’s a HUGE addition. Now that also includes Codex (a completely different experience), it may be worth it.

Comments
Post a Comment